Showing posts with label Tutorial. Show all posts

Sunday, August 4, 2019

Creating an Adjustable Slide Knot...

I've been making necklaces with an adjustable slide knot. This gives the wearer a lot of options for length and style of the piece. You can go from 16" choker to 32" necklace by sliding the knots to get the look that's right for you. Below you will find an example of the necklaces I'm making, and a tutorial on how to make the sliding knots.


Step 1


  • You need two ends of cord. I’ve used one brown and one blue for the purposes of illustrating this technique. You can use any colors you’d like. Normally, I would use two of the same color.


Step 2


  • Cross the brown cord over the blue and wrap 2 times.


Step 3


  • Take the end of the brown cord, go back over the 2 loops you made and poke it through the loops.


Step 4


  • Pull tight on either side of the knot, but be careful not to pull too tight, you need to be able to slide the knot along the blue cord.


Step 5


  • Repeat steps 2-3-4 using the blue cord on the brown.


Step 6


  • Now you have a loop you can adjust by sliding the knots away or toward each other.


Have fun crafting!
Cheers!

Lori in Blue Ridge, GA


Share this Blog Post :

Thursday, October 6, 2016

BOO Y'ALL....

As seen on all*you blog
Make a Kittycat Pumpkin Craft for Halloween

Craft this adorable pumpkin overflowing with kitties for the cutest Halloween decoration.

YOU'LL NEED
  • Scissors
  • Ribbon in a variety of widths and patterns
  • Large pumpkin, hollowed out
  • Craft glue
  • Thumbtacks
  •  Ear Template
  • Black cardstock
  • Pencil
  • Patterned scrapbook paper
  • 5 small foam pumpkins
  • Hot glue gun
  • 10 black thumbtacks or 10 1/4" black buttons
  • Black floral wire
  • 5 pencils, sharpened
  • Florist foam
1. Cut pieces of ribbon long enough to extend from inside top edge of large pumpkin to the underside. Starting at bottom, use craft glue to attach ribbon pieces one by one to each pumpkin rib (the raised part between the grooves). Secure end inside pumpkin with a thumbtack.
2. Print templates and cut out. Place ear and nose templates on black card stock and trace around, making 5 noses and 5 pairs of ears. Cut out. Place inner-ear template on patterned paper and trace around, making 5 pairs. Cut out.
3. Use craft glue to attach a patterned-paper inner ear to each black-card-stock outer ear. Let dry. Hot-glue one pair of ears to each small pumpkin.
4. For eyes, insert a pair of black thumbtacks into each pumpkin, or use craft glue to attach a pair of black buttons. Attach a nose to each pumpkin with craft glue. Cut four 1½″-long pieces of wire for each pumpkin. Attach two wires on either side of nose with hot glue.
5. Arrange foam in bottom of large pumpkin. Insert sharpened end of a pencil into bottom of each kitten pumpkin and insert other end into foam. Prop top of pumpkin on kittens.
(As seen on all*you blog)
Cheers!
Lori in Blue Ridge, GA

Share this Blog Post :

Thursday, July 5, 2012

Wire Wrap Loop Tutorial


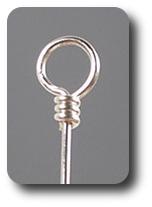
Exampe of Wire Wrap Loop

Wire wrapping is one of the oldest techniques for making handmade jewelry. In wire wrapping, jewelry is made using jewelry wire or findings similar to wire (like head-pins) to make components. Wire components are then connected to one another using manual techniques with no soldering or heating of the wire.

Example Wire Wrapped Lopp
I use this method when making my pearl “Bubbles” bracelets. The technique is easy and with a little practice I learned to make a perfect loop every time. Basically, wire is bent into a loop or other decorative shape and then the wire is wrapped around itself making the loop permanent. I found a great tutorial that explains step by step how to make a perfect loop. Give it a try….


Share this Blog Post :

Monday, October 24, 2011

Tutorial: $6 Solution to Jewelry Photography


I’m sure you’ve read countless articles about taking great pictures for your Etsy shop.  Today, while I was browsing my favorite blogs, I came across an easy to follow tutorial for taking pictures of your Jewelry.  I’ve learned that photographing jewelry has its own unique set of problems; diminished light and shadow, reflection, out of the ordinary iridescence, and small details, making the process harder than other types of photography.  And don’t even get me started on photographing Pearls!  The tutorial written by “Via U!  It’s your shot gives an easy and inexpensive way to get great pictures of your product.


The Tutorial below is published with the consent of: Via U! 


A window and a piece of cardboard is all you’ll need to take pictures of silver jewelry with brilliant, even tones....

1.) Move a table as close to a window as you can.


2.) Make sure that the top of the table is a higher than the window sill.


3.) Tape a piece of tracing paper to the window. Sunny or cloudy skies, the paper will make light coming in to be even and soft. Hang the paper so it goes down below the table.


4.) When using white paper as a background put something white underneath to avoid the table coming through making it look dark.


5.) I used a 2’ x 2’ piece of foamcore to bounce back light from the window, you can use anything that stands upright without bending. A piece of cardboard covered with sheets of white paper will work great.


6.) Light will reflect from the white card and from the white surface as well.


7.) Silver is like a mirror, it shows whatever is around. The light and white paper will reflect on the metal making it look light and shiny.


8.) If you pull the white card away from the window it will create a dark area that will also reflect on the jewelry.


9.) Different tones of silver make a picture have more depth. You may like the way it looks, or you may not. If you prefer the silver to have even tones make sure that the card is flashed against the window.


10.) However, if you do want your background to have a gradation of tones try replacing the white card with a black one. Blocking the light will create a shadow with a clear edge.


11.) Then you can play placing your jewelry where the background shifts from light to dark to see what happens.


Share this Blog Post :

Wednesday, October 12, 2011

"Pin It" to your blog........


I was reading a great blog this morning, that pointed to another blog, which led to reading another, and on to another, ...(you know what I mean) until I landed on this great blog. Julie Ann's blog, Julie Ann Art, is a wonderful collection of DIYs, tutorials, and overall blogger inspirations. She even has cute puppy photos (I'm a sucker for cute puppies). Did you see my new "Pin It" button at the bottom of each of my blog posts?  Julie Ann's tutorial showed me step by step how to add the button. It was easy to follow her instructions and understand her screen capture images even with my limited HTML skills.  Check it out!
Share this Blog Post :