Showing posts with label How To. Show all posts

Thursday, July 5, 2012

Wire Wrap Loop Tutorial


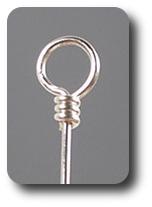
Exampe of Wire Wrap Loop

Wire wrapping is one of the oldest techniques for making handmade jewelry. In wire wrapping, jewelry is made using jewelry wire or findings similar to wire (like head-pins) to make components. Wire components are then connected to one another using manual techniques with no soldering or heating of the wire.

Example Wire Wrapped Lopp
I use this method when making my pearl “Bubbles” bracelets. The technique is easy and with a little practice I learned to make a perfect loop every time. Basically, wire is bent into a loop or other decorative shape and then the wire is wrapped around itself making the loop permanent. I found a great tutorial that explains step by step how to make a perfect loop. Give it a try….


Share this Blog Post :

Monday, March 19, 2012

Idea found on Pinterest...

Have you ever come across a homeless individual and felt totally uncomfortable?

I live in the city and see drifting individuals every day. I do know from my volunteer work that handing them money is not the best thing, but they do have needs that I can help with. Their lips are chapped. They are hungry. They are thirsty. They need a little boost.

Here is a simple idea that I came across on pinterest:


Blessing bags….

Blessing Bags Photo
Photo by Julie of Joy's Hope

This seems like an easy project and one that the entire family can get involved in. We are now going to keep a few "Blessing Bags" in our car so that when we do happen to see someone on the street that is homeless, we can hand them a Blessing Bag. If you'd like to make your own Blessing Bags, here is an example list of items you might include:

1 Gallon Ziploc bag to hold the items
Throat lozenges
Trial size Ibuprofen/Acetaminophen
Hand sanitizer
Hand or face lotion
Packaged hand wipes
Lip balm
Tooth brush and toothpaste
Soap/shampoo
Washcloth
Comb
Band-Aids
Small selection of ready-to-eat protein rich food such as:
   Cheese and crackers
   Power bar or Granola
   Tuna in a bag (no cans requiring an opener)
   Beef jerky
One sweet item such as single serving fruit or pudding
Juice box
Plastic utensils and napkin
Prepaid phone card
Pair of men's socks
Local resource list for the homeless

This would also be a great activity to do with other families in our neighborhood. Each family could bring one of the items going into the bags (ex: toothbrushes). Using an assembly line approach we could fill the Ziploc bags in no time.  I think I’ll work on this for our next neighborhood alley party.

Let me know if you can think of any other items that might be helpful to a homeless person.
Thanks!


Share this Blog Post :

Monday, October 24, 2011

Tutorial: $6 Solution to Jewelry Photography


I’m sure you’ve read countless articles about taking great pictures for your Etsy shop.  Today, while I was browsing my favorite blogs, I came across an easy to follow tutorial for taking pictures of your Jewelry.  I’ve learned that photographing jewelry has its own unique set of problems; diminished light and shadow, reflection, out of the ordinary iridescence, and small details, making the process harder than other types of photography.  And don’t even get me started on photographing Pearls!  The tutorial written by “Via U!  It’s your shot gives an easy and inexpensive way to get great pictures of your product.


The Tutorial below is published with the consent of: Via U! 


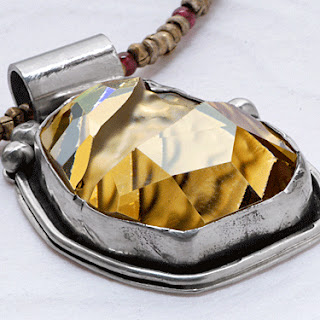
A window and a piece of cardboard is all you’ll need to take pictures of silver jewelry with brilliant, even tones....

1.) Move a table as close to a window as you can.


2.) Make sure that the top of the table is a higher than the window sill.


3.) Tape a piece of tracing paper to the window. Sunny or cloudy skies, the paper will make light coming in to be even and soft. Hang the paper so it goes down below the table.


4.) When using white paper as a background put something white underneath to avoid the table coming through making it look dark.


5.) I used a 2’ x 2’ piece of foamcore to bounce back light from the window, you can use anything that stands upright without bending. A piece of cardboard covered with sheets of white paper will work great.


6.) Light will reflect from the white card and from the white surface as well.


7.) Silver is like a mirror, it shows whatever is around. The light and white paper will reflect on the metal making it look light and shiny.


8.) If you pull the white card away from the window it will create a dark area that will also reflect on the jewelry.


9.) Different tones of silver make a picture have more depth. You may like the way it looks, or you may not. If you prefer the silver to have even tones make sure that the card is flashed against the window.


10.) However, if you do want your background to have a gradation of tones try replacing the white card with a black one. Blocking the light will create a shadow with a clear edge.


11.) Then you can play placing your jewelry where the background shifts from light to dark to see what happens.






Share this Blog Post :

Tuesday, October 4, 2011

Fabulous Giveaway...

  • Ricki Shumacher has launched a new e-workshop blog. In honor of this, she's giving away a few tutorials, a kit, and the above awesome stash of goodies! All you need to do to enter the drawing is follow the new blog; bonus points for chatting about it on your blog. Good Luck!
Enter by midnight on Saturday 10/8/2011

    Share this Blog Post :

    Friday, September 23, 2011

    One Key Piece...

    Only 37 days until Halloween! I’m a diehard do-it-yourselfer when it comes to costumes, but this year I need a little inspiration. All I need is one good idea and I’ll be able to create unique Halloween costumes for myself and the grand kids. I turned to Etsy for motivation….


    Sometimes a creative accessory can influence the entire Halloween costume. I’ve also found that my best costumes are often the simplest using bits and pieces I have on hand with the key element. Here are some great examples of costumes made using one key item and very simple clothing already in the closet....

    The Halloween count down is on!


    Share this Blog Post :

    Thursday, June 2, 2011

    The “Top Four”

    Today's "Top Four" in my Etsy Shop

    Did you know that the first four photos in your Etsy shop carry a lot of weight in the linked world of Etsy? Like many other Etsians, I love to shop by searching through other members' list of Favorite Sellers. Have you noticed the four photos that show up next to the avatar on these Favorites lists? They are the first four items (the last four you listed) in your shop — NOT necessarily your "Featured Listings."

    Make sure these four most recently listed items are representative of the variety of items available in your shop, or you may be missing out on your target audience...if you sell necklaces, bracelets, and earrings, don’t let four earrings sit in the “top four.” Mix it up, so it is clear you offer more than one style of items. Take care to notice this each and every time you renew or add a new item listing. The "top four" serve as a mini snapshot of your shop.
    Share this Blog Post :

    Tuesday, September 21, 2010

    Cleaning Copper Jewelry


    I've been making a lot of jewelry using copper findings. I think copper is perfect for autumn accessorizing. I found this great article on how to clean copper jewelry. I'm off to the kitchen to try this...

    Tips From Handmadeology:

    Supplies: a small glass or ceramic dish, the acidic cleaning agent of your choice (I use lemon juice), a old toothbrush, soap and a drying towel

    "Gather your supplies and your copper jewelry. Place one piece of jewelry in the dish and pour the cleaning agent over the item and allow it to set for a short time in the liquid, about 10 to 20 minutes. I usually use a couple of tablespoons of lemon juice and turn the copper over every few minutes to assure an even cleaning. NOTE: You may have to change the cleaning liquid a couple of times if the copper is extremely dirty. To move the process along, you may use your old toothbrush to gently scrub into the cracks and crevasses of the design. When you have achieved the desired cleaning, run clear water over the jewelry to rinse. Then use a little soap and the toothbrush to clean just a little more, rinse and pat dry with a towel."

    "Please DO NOT leave your jewelry in the acid soak for and extended period of time OR if your copper jewelry has pearls, or any other soft stone DO NOT use any of these ways of cleaning!"

    Have a great Day! Thanks for stopping by.
    Share this Blog Post :