Showing posts with label Design. Show all posts

Sunday, February 4, 2018

Artist Trading Cards - (ATC) - Swap-bot

Have you heard of Artist Trading Cards (ATC)? They are small original works of art exchanged amongst artists. They are given away, never sold. The size of ATCs is 2.5 x3.5 and are typically made on card stock or heavy watercolour paper.  The tiny works of art are exchanged in person or online in group swaps. There are several swapping sites open to general interest people from all over the world. The ATC community accepts people from all abilities, using a wide range of  medium to create their cards. 

I belong to the online group Swap-bot.  This group is very large and has hundreds of themed swaps. They not only sponsor ATC swaps, they also have many other outlets for creative swapping. I've participated in fiber, collage, journal page, ephemere, and decorated envelope swaps, but my favorite is the ATC swap.

Here is an example of the card I'm sending this week.....

The theme of this swap was "Profile Based"; after I was assigned a swap partner, I took a look at her profile for ideas on what she like, where she lived, and any special requests.  She is an Emergency Medical Technician living in Cheyenne, WY; she said that she would like to receive a emergency services themed ATC...so that is what I made for her. 


EMS - Artist Trading Card

I used a collage technique to create this card. I included a map of Cheyenne, Wy as the background, added emergency services ephemere, and vintage photos.  I like how it turned out. 


I drew and colored this cute little ambulance on the front of the envelope I'm using to send the trading card.  I hope she will like them. 

Additional Envelopes that I've created...

I always decorate the envelope I'm sending the cards in.  It is so much fun to open the mailbox and find brightly colored mail in amongst the bills and such....I love swapping! Below are examples of other decorated envelopes that I've sent recently...


Check out Swap-bot if you are looking for a creative outlet, but be careful, it's addicting!

Cheers,
Lori in Blue Ridge, GA


Share this Blog Post :

Monday, June 20, 2016

The yard needs some TLC...

Our new home needs some gardening TLC.  The house had not been occupied for over a year and had been used as vacation home only.  The yard has amazing potential, but no effort has been made other than basic mowing and edging so it would sell.  We have zero curb appeal and a lot of weeds and trimming to deal with.  I'm considering hiring some help to get a good foundation in place that I can build on. Here are some fun decorative ideas that I found on Pintrest....I love them!

1.) Hostas are one of my favorite plants, they are very striking when used as a potted plant. I'd love to do something like this for the front porch.  It is covered and shady...just what hostas love...shade.
Container Plants

"Hostas in a pot! every spring they return...in the pot! Add geraniums and ivy."


2.) Another favorite of mine are succulents in a big low profile pot.  Not sure where I would put this, but I love it!
Container Gardening

"Love this container, looks like floating water lily. Of the blue-glazed birdbath pictured here, Baldwin writes: "Purple and pink echeveria suggest water lilies. White-webbed Sempervivum arachnoideum rosettes sparkle like sunlight on the surface of water, and in their midst is a flat green Aeonium tabuliforme (lily pad aeonium). A topdressing of green and blue florist's marbles enhances the illusion." Baldwin took the photo at the California Cactus Center in Pasadena, and the design by Arree."


3.) The previous owner left a old wine barrel and a lot of old galvanized buckets and tubs, I plan to do something creative with them, this is a good example of what I want to do.
Container Gardening

"Love the bright colors of this impatient mix, it will brighten up a yard that is a sea of green grass and trees."


4.) Last but not least we have a significant slope that has been sliding down to the driveway with every rain storm. WE will be putting in a retaining wall, but I would also love something like this.  I absolutely love the different textures, the rocks and plants will satisfy that craving for texture. Love it!
Rock Garden

If you have any ideas or photos of fun landscape installations, please send them my way.

Cheers!
Lori 


Share this Blog Post :

Sunday, April 10, 2016

New Design Space...

Now that I'm no longer working in the corporate world, I'm dedicated to reinventing myself and pursuing my creative side... 


I ordered this corner desk unit to use as my creative workstation at the new house. I will have a dedicated room for my studio. 

I plan to revamp and expand my current Etsy jewelry shop and develop a new shop dedicated to wedding decor.

I'm so excited to begin this new chapter in my life!


This piece will be used as my printer stand and file cabinet for my Etsy orders paperwork.  I like the wood grain finish and the industrial look framework.  


I will have two of these matching tall shelf units flanking the corner desk. One will be used for bead container storage and the other for wedding decor storage.  I will have easy access to both units for supply selection when I'm working on a project. I won't need to jump up and down to reach supplies like I do now in my current space.


We move to the new house in about three weeks.  I can't wait to get started on my new life!
Cheers!
Lori


Share this Blog Post :

Friday, November 16, 2012

Challenge of Color Blog Hop


WooHoo! I’m one of the 80 participants in the 3rd Annual Challenge of Color.

If you’d like, you can read about this challenge in detail HERE.

Erin of Treasures-Found randomly assigned me two uniquely different color palettes based on satellite images of the planet earth. The challenge is to use one of the pallets to design and create a piece of handmade bead jewelry. Here are the two images I was sent:


 From the two options I selected the Lakes District for my jewelry design.  I love the vibrant colors and immediately thought of beads in my stash that fit beautifully into this color mix.  Since there will likely be more than one person using the same palette, it will be interesting to see how the same image and palette produce different results.

Now I need to get busy selecting beads, clasp, findings, and the technique I want to use for this challenge! I think I’ll make a necklace with matching earrings. Stop by my blog on Friday November 30 to see my finished design.

If you're interested in seeing some of the other stunning pictures that inspired the color pallets for this challenge, check out the Earth As Art image gallery.

Cheers!


Share this Blog Post :

Thursday, October 11, 2012

Help pick the ornament design...


Sitting on the front porch with my Sweetie, enjoying a glass of wine after work, is one of my favorite ways to relax.  Looking at the large pile of wine corks that we’ve collected over the years, you would think we must be very relaxed by now…  Not with that pile of corks just begging to be turned into something cool!

Wine Bottle Corks

Inspiration for repurposing the corks came by looking at cork projects on pinterest and Etsy. There were many cute ideas, but I was most captivated by the Christmas ornaments. Donna Patton (not a relative for those who know my maiden name) has a great way to display the ornaments on her Etsy site: an ornament tree.  

Here is how I need your help: If you were picking out a tree decoration for yourself or for a gift, which design would you choose from the following designs…


Wine Bottle Corks
Garland - $25.00


Wine Bottle Corks
Simple Button Ornament - $8.00


Wine Bottle Corks
Holiday Ribbon Ornament - $10.00


Wine Bottle Corks
Fancy Ornament - $14.00


Thanks in advance for your help and input. Cheers!


Share this Blog Post :

Tuesday, July 10, 2012

Summer 2012 Bead Soup Blog Party Goodies...


Take a peek at the goodies I received from Kayla Potega, my partner for the July 2012 Bead Soup Blog Party. Kayla from The Eclectic Element creates lovely jewelry featuring up-cycled vintage beads and findings. I love the fact that her designs are 90% recycled materials, even elements of her packaging is up-cycled. Based on her eclectic style and vast collection of vintage materials, I was excited to see what she would send.

I was delighted when I opened the package from Kayla, so many wonderful vintage items to play with! The goodies are spread out on my bead bench so I can think about how I will use them in my Bead Soup design. I want to really challenge myself this time, so in preparation for the event, I outlined 10 ways
(see them here) to improve my experience and grow as a designer.

Just look at all the treasure Kayla sent!

Bead Soup Blog Party Goodies

I removed the individual bags to reveal the materials I will use for this challenge. The idea is to work outside our comfort zone to design a jewelry piece using the beads selected by a partner. Kayla's selection for me included fabulous textures and shapes... there are so many great items, I don’t know where to start. The clasp is really wonderful and I have several focal beads to choose from.

Check back on July 28 when my finished design(s) will be revealed. I will also post a list of the other participants so you can hop around to the other blogs and see what they have created using the beads they received. Cheers!

 See Kayla's Etsy Shops Here:


Share this Blog Post :

Thursday, July 5, 2012

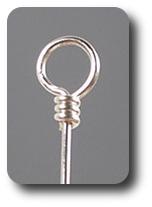
Wire Wrap Loop Tutorial


Exampe of Wire Wrap Loop

Wire wrapping is one of the oldest techniques for making handmade jewelry. In wire wrapping, jewelry is made using jewelry wire or findings similar to wire (like head-pins) to make components. Wire components are then connected to one another using manual techniques with no soldering or heating of the wire.

Example Wire Wrapped Lopp
I use this method when making my pearl “Bubbles” bracelets. The technique is easy and with a little practice I learned to make a perfect loop every time. Basically, wire is bent into a loop or other decorative shape and then the wire is wrapped around itself making the loop permanent. I found a great tutorial that explains step by step how to make a perfect loop. Give it a try….


Share this Blog Post :

Tuesday, June 26, 2012

Oh for the Love of Birds...


I love birdhouses! I find that watching the birds in the garden is very relaxing and enjoyable.  I think I inherited my love of birdhouses from my father.  His property in Indiana is a mini ecosystem not far from the city of Chicago. His property attracts all kinds of wild life. The back deck of the house, overlooking the wetlands, is a perfect place to sit and watch the many birds that visit his property. He has a wonderful collection of birdhouses and feeders on every tree and post.

 I love the idea of re-purposing!  Re-purposing is taking an object and using it for something entirely different than its original purpose. You probably already have some re-purposed items around your home without even realizing it. The mug on your desk used to hold pencils, the old water pitcher used to hold cut flowers, or the red wagon used as a garden cart now that the kids have grown. All good examples of re-purposed items.

 So, combining birdhouses and re-purposing is just about perfect in my book. Let me show you a few examples of re-purposed birdhouses from around the blogosphere ....

Upcycled Birdhouse
http://fowlplaces.com/bobbin.html
This birdhouse was created by incorporating a re-purposed 80+ year old wooden bobbin from the Pendleton woolen mills. The Pendleton Bobbin Birdhouse is a unique blend of previously used wood, metal and glass utility pole insulators. 


Upcycled Birdhouse
http://www.grandiflora.pro/cool-pics/bird-houses-and-bottle-trees
 I loved Charles Chips as a kid; they came in a large metal canister that sat on the counter.  Once a week the Charles Chips delivery truck would pull up to refill our canister, I couldn’t wait for that delivery day!  This bird house is made out of one of the chip canisters. Love it!


Upcycled Birdhouse
http://www.etsy.com/listing/83747525/coffee-can-birdhouse-whimsical-birdhouse?ref=v1_other_1
This little birdhouse is completely made with re-purposed items from the kitchen. Cute! This website has many interesting birdhouses and feeders.


Upcycled Birdhouse
http://www.junkmarketstyle.com/item/36287/yellow-porcelain-enamel-pitcher-birdhouse
The re-purposed yellow pitcher birdhouse as described by the designer:  “It's just a little bit of sunshine”.  I’m sure the birds at my dad’s place would love this!


Upcycled Birdhouse
http://thebrambleberrycottage.blogspot.com/2011/09/sweet-tweet-retreat.html#comment-form
The Brambleberry Cottage really went "sky-high" on this one-of-a-kind re-purposed birdhouse. They’ve got a barn full of found items and decided to put something together for the birds. I adore the perch which is made out of an old coffee grinder handle and the chicken feeder top that became part of the post decoration.

So you’re ready to give it a try and you’re wondering where to scavenge for materials? Stop at construction sites to ask for whatever scraps and leftover materials they won't be using. Check out the local flea market or farm sale. If a building is being torn down, ask if you can scavenge old hinges or discarded bits and bobs.  And without plundering protected wildernesses, consider nature: use a particularly gorgeous stone as a decoration, or make a birdhouse hanger by sanding down a sturdy branch and nailing a few (scavenged/found) hooks into it.  Take a walk on the wild side and have fun!


Share this Blog Post :

Monday, June 11, 2012

Bead Soup Blog Party...Ten stress-free steps...

  The next Bead Soup Blog Party is just around the corner.  I’ve been thinking about how I want to approach the upcoming event.  In the past I’ve completed designs that I was comfortable with, but that isn't the point of this ‘Party’.  It is meant to challenge creative limitations and help you try something new.  So in preparation for the next Bead Soup event, I have outlined 10 ways (listed below) to improve my experience and grow as a designer. If you are interesting in reading about the Bead Soup Blog Party, check out Lori Anderson’s blog “Pretty Things”.


My Past Bead Soup Blog Party Designs

My New Design Process for the Bead Soup Blog Party…
  1. You need to keep in mind what’s interesting to you as a designer, not what’s easy to do as a jewelry maker. They can be very different.

  2. Simplify. Focus. Define your color pallet. Which beads will you use from your soup ingredients? You may feel like you’re losing valuable stuff, but it sets you free.

  3. Visualize jewelry designs you love. What you love about them is a part of you; you’ve got to recognize it before you can use it.

  4. Think about what you are good at, comfortable with. Now what is the polar opposite of that? Challenge yourself.

  5. Discount the 1st design that comes to mind. And the 2nd, 3rd, 4th, 5th – get the obvious out of the way. Surprise yourself.

  6. Visualize or draw a finished piece before you figure out how to create it. Seriously. New design direction is hard; get your design well-defined up front.

  7. No effort is ever wasted. If it’s not working, let go and move on - it’ll come back around to be useful later.

  8. Recognize your skill: the difference between doing your best & fretting. Design is about trying, not worrying.

  9. If you were wearing this piece, how would you feel? Use that feeling to describe your work.

  10. Finish and post your design, let go even if it’s not perfect. In an ideal world you have both (finished on time and perfection), but even if you don’t have both, know that you embraced the challenge and created something from your heart.
Cheers!
Share this Blog Post :

Wednesday, April 4, 2012

Five Little Monkeys.......

Do you ever have a song stuck in your head?  A snippet of the tune keeps coming to mind over and over and over?  I've had a well know childrens song swirling around in my head for days now.  It was triggered by a wonderful cake design by "i Heart Cakes" in the photo below.  I spotted this cute cake while searching for a grooms cake in a DesignBeep blog post featuring 70 wonderful cake designs. Isn't this the cutest cake you've ever seen!


Cake by "i heart cake" Five little monkeys jumping on the bead.
Designed by -  iheartcakes.com


"Five little monkeys jumping on the bed
One fell off and bumped his head.
Mama called the Doctor and the Doctor said,
"No more monkeys jumping on the bed!"


Share this Blog Post :

Friday, May 21, 2010

What is "Lampwork"?.....


Some of my work contains my handmade lampwork beads. Lampworking (flameworking) is the art of melting and manipulating glass in a flame. The glass rods that are used are different types of glass ranging from “soft“ to “hard” glass. 

The glass is wound as it melts around a steel wire welding rod (called a mandrel) that has been coated with a clay based material called “bead release”. This prevents the glass from sticking to the metal rod. After laying down my initial layer of glass, I shape my bead by using gravity. At this point I can decorate the bead by rolling it in frit (crushed glass), adding dots of glass, or laying down strings of a different color glass.

When I have finished shaping and decorating my bead, I then place it into a kiln (small oven) that is turned on and set to the annealing temperature for the type of glass I was using.  The kiln slowly brings the temperature of the bead down so it does not crack.

When the bead is at room temperature, I remove it from the mandrel and clean the clay out of the inside of the hole. I usually break off the bead release first over a garbage can and then soak them in water. Once clean the beads are ready to use in my jewelry design. Lampwork beads are one-of-a-kind pieces of art.

Share this Blog Post :